Friday 30 September 2016

Makeup Inspiration from London Fashion Week , SS17

London fashion week has gracefully flown by and I have not stopped checking my phone to spot the hot beauty trends on the forecast for spring/ summer 2017. Like every season, I have been left feeling extremely inspired and ready to experiment with new makeup trends and techniques. 

If like me you struggle to keep up with the whirlwind of fashion week, I have packed together a good roundup of the hottest makeup trends seen on the catwalk this season. 

Val Garland, phenomenal British makeup artist is a woman whose work I admire, so I am always intrigued to see what work she produces at fashion week. 
This season Val focused on bold lips and fresh, bare skin with a grunge feel. I especially love the look that she created for Gareth Pugh. The makeup was very messy which I really liked.
The models skin was kept bare with a strong glow. Highlighter is definitely here to stay. 
Gone are the days of strong overdrawn eyebrows; all of the models sported ungroomed messy brows brushed upwards. I absolutely love this look!

(Makeup by Val Garland for Gareth Pugh) 

To achieve this messy brow trend, reduce your trips to the eyebrow threading / plucking / waxing salon and stop trimming the hairs too often. If you don't want to leave your brows completely bare, use a wax eyebrow pencil and finish with a tinted eyebrow mascara / gel and brush upwards. MAC Brow Sculpt pencil and Maybelline Brow Drama are the perfect tools. 


A trend that was spotted at both the Gareth Pugh and Mother of Pearl shows was a very bold smudged lip line.  Does this suggest that lip liner is out? What do you      think?

There were a lot of 80's and 90's inspired looks on the catwalk this season, for example at the TopShop Unique show the models hair was tightly curled with lots of volume. 


Glossy skin, glossy lips, glossy eyelids .. everyone added a touch of gloss to their look this season. Exaggerating the strobing trend with a gloss really stood out to me and I will definitely be experimenting with this trend.


Generously applying a glossy balm like Elizabeth Arden 8 Hour Cream to the lips will give a plump glossy finish and you could also buff it into the skin for a great high fashion look.


I recently created an 80's inspired high shine eye using Kiko Clear Lipgloss which looks great on photo. 

 
Makeup by myself, Alice Marie Rouillon 


I always love fashion week: it feels like a breath of fresh air with lots of new exciting ideas for the creative industry!

Did you spot any different looks from me on the catwalk this season? Let me know in the comments!


Monday 26 September 2016

Smokey Eye In 5 Simple Steps

Something I get asked constantly is how to do a smoky eye and it's really not as complicated as you think. A smokey eye can be whatever you make it.

When most people think of a smokey eye they imagine perfectly blended super dark eyes which can look great when done right ; although it can be very hard to achieve and it is easy to end up with major panda eyes which isn't such a great look!

You don't have to be an amazing makeup artist to create a smokey eye and in this post I want to show you how to achieve a glamorous smokey eye makeup that is super effective and really easy to achieve.

I am going to use only 4 eyeshadows for this look and they are all MAC single eyeshadows which I have placed into an empty quad pallet to create my perfect smoky eye pallet. You can create your own custom pallet in MAC stores by choosing from the single pro pan eyeshadows and buying an empty pro pallet.

Step 1 : Prep
To create a good base for the eyeshadows I always apply MAC paint-pot all over the eye lid and I then set it in place with a loose translucent powder. This will make the eyeshadows stay in place all day and it will also provide a smooth base to help the shadows blend together and make the colours stand out.

Step 2 
Once I have the base on I am then ready to start applying the eyeshadow. Starting with Wedge eyeshadow which is a matte light brown, I apply the colour all over the eye lid and through the crease. To do this I use a small fluffy brush like the MAC 217 or the MyKitCo 1.6.
In between each step I always use a large blending brush like the Zoeva 228 to soften any edges and give a flawless finish.

Blending is key to achieving a flawless eye makeup: just remember to blend in between each step rather than only blending at the end.

Step 3 
Next I use Embark eyeshadow which is a deep brown to darken up the outer corner of the eye. To apply this shadow I use a slightly smaller crease brush like the Zoeva 231 which gives more precision and keeps the colour in one place.With a small amount of product on my brush,  I also take this shadow slightly under my eye and along the lash line to start to create a smokey effect. To do this I use a small pencil brush like the Zoeva 230.


Step 4 : Smoke it up 
If you are happy with how dark your eye makeup is looking at this point then you can skip the next step although if you do want it to look a little more smokey then using a small amount of Black Tied eyeshadow you can easily smoke it up! Black Tied is a great black eyeshadow with a slight shimmer. Using a small pencil brush, press the shadow close to the upper lash line and slightly out and upwards towards the crease. Keep applying the eyeshadow with the small brush and blend it out with a larger brush until you are happy.

Step 5 : Highlight 
Finally to add a pop of shimmer, apply a small amount of Nylon eyeshadow on the inner corner of the eye and slightly dust over the brow bone to make everything pop.

Finishing with a few coats of mascara and maybe some false eyelashes you are ready to go with a super sexy smokey eye that is easy to achieve in just a few simple steps!


I hope that you found this helpful and please leave comments below on any other blog posts that you would like to see from me.


Monday 1 August 2016

Urban Decay Moondust Eyeshadow Pallet : My First Impressions & Review

Urban Decay are one of my all time favourite makeup brands and I am always so excited when I hear that they are launching a new product. A few weeks ago Urban Decay launched their brand new Moondust eyeshadow pallet in the states and I could not wait to get my hands on it.
The Moondust pallet became available in the UK online last week and I could not click 'add to bag' fast enough! 

Urban Decay already have a range of single Moondust eyeshadows in their collection which are high pigmented shadows with an iridescent sparkle and can be used wet or dry to create an eye catching look. I really love these eyeshadows and they have the best glitter pigment out of any other similar shadows that I have tried. 

I love creative makeup and I am never afraid to add a pop or colour or glitter to a makeup. I understand that this pallet won't be everyone's cup of tea however for me it is a dream. 
On the other hand, I think that you could definitely use the shadows in moderation and create a subtle glamorous look which isn't too bold or dramatic- the shades Specter and Lithium are lovely nude shimmers. 
I think that Urban Decay have picked the perfect range of shades for this pallet which allows you to create multiple different looks.


For £35 you'll receive 8 exclusive brand new Moondust shadows inside a beautiful sparkly silver pallet with a large mirror. I think that the price of this pallet is fantastic considering you get 8 high quality eyeshadows which when bought alone as single Moondust shadows (from the original line) would cost you £14 each. 

Inside you will find 8 new shades, including Specter, Element, Magnetic, Lightyear, Granite, Lithum, Vega and Galaxy. All of the shadows are extremely pigmented and all have a glitter finish.


Specter is a pretty shimmering pink with gold reflects. I think that this shade would look great used as a highlight on the inner corner of the eye or alternatively packed all over the eye lid with matte shadows blended through the crease. 

Element is a warm red copper with pink sparkle. Element is extremely pigmented and is the ultimate summer 'fire' colour. I love it and I know that it will look stunning as a spotlight on the eye lid. 

Magnetic is a great deep purple with lots of glitter. I know that this is a colour that I will get a lot of use out of and it will look great used when creating a deep smoky eye- perfect for parties and special occasion makeup! 

Lightyear is a bright grass green with blue sparkle. This is unlike any other eyeshadow that I have in my collection and I am so excited to start using it. Lightyear is probably one of the brightest and most 'unwearable' shades in the pallet however I know that it will be great to use when I want to achieve a dramatic and creative look. 

Granite is a dull grey with lots of silver glitter. This will be the perfect addition to a matte smoky eye to add a special touch. 

Lithium is a bronze gold and would perfectly compliment a warm smoky eye. I like that Urban Decay have included a range of both warm and cool tones to this pallet, for example Lithium is a great warm shade and Granite is a lovely cool alternative. 

Vega is a strong ocean blue. I love shades like this and I know that I will get a lot of use out of it. 

Galaxy is a beautiful space blue with grey tones. Galaxy is a very unique shade which gives off different tones in various lights- I love it!


Overall I am extremely impressed with the Moondust eyeshadow pallet and I know that I will be using it a lot. Although it may look over the top and unwearable I can assure you that almost every makeup lover will be able to find a way to make it work for them. 
I love the packaging, price, quality and shade range and am yet to fault anything. 

Have you got your hands on the Moondust pallet yet? Let me know in the comments what you think! 


Wednesday 6 July 2016

Thick, Bold & Messy Brows ... How to Achieve This Current Trend

Gone are the days of the thick, full and over drawn eyebrows ... current makeup trends suggest that the bold brow is out and a much more natural fluffy brow is what the future holds.


Just a month or so ago I posted a dramatic eyebrow routine which showed you how to create a full and strong brow which looks great paired alongside a glamorous full face of makeup however on an everyday basis I now always opt for a very different look.
Strong brows still look great for certain occasions although I have definitely noticed that trends are changing and the desired look is a much more fresh and messy brow.

I have certainly changed up my everyday eyebrow routine and in this post I will share with you my tips and tricks for achieving the ultimate fluffy brow that is a massive makeup trend right now!


Maintenance 
Maintaining your eyebrow shape is important but there is no need to get carried away. If you must, get them plucked, threaded or waxed to set you off with a good shape but you can then easily maintain the shape with a good pair of tweezers at home.

I get mine threaded at Benito Brow Bar (located in most large Debhanams) from time to time however I much prefer to use my trusty Tweezerman tweezers at home to shape my brows to my own liking. Ask the beautician not to trim your brows unless it is absolutely necessary as you will want to push up the hairs to give a super messy finish.
Pluck the hairs underneath your brow bone and in between each brow if needed - avoid plucking above the brow because this is unnecessary and doesn't look natural.
The messy look is in so don't worry about stray hairs - it all adds to the effect!

Tinting your eyebrows will temporarily dye the hairs which looks great and is especially very effective on fair hairs. If you don't have the time to or don't wear makeup everyday then tinting is a great option for you because your eyebrows will appear darker and give the impression that you have makeup on even when you don't.

Makeup 
Obviously less makeup is needed when creating a natural brow and you may choose to apply no makeup whatsoever however I do still like to define and fill in any sparse areas with some product to help frame my face and eye makeup.

I always start by brushing up the hairs completely and then I grab an eyebrow gel (I use the Illamasuqa Precision Brow Gel or the Anastasia Beverly Hills Dipbrow Pomade) to lightly define the hairs with a small sharp liner brush. Zoeva's 317 brush is my choice however any fine angled brush will do. I like to apply the product very lightly at the tail of the brow and slightly on the bottom line and then I thoroughly brush the product upwards with my MyKitCo 2.1 brush.
Brushing all the product upwards will spread the product all throughout the brow and it will remove any harsh lines. I continuously brush the hairs up when applying the product to help myself achieve the desired look.

Next, to achieve a pushed up messy effect that will last all day I like to use a setting gel to push up all the hairs. Maybelline Brow Drama is great but any brow setting gel or clear mascara will do.


Finally, if any product has landed where it shouldn't have or if you want your brows to stand out even more you can grab a concealer and use it to add more shape and definition. Only apply the concealer underneath your brow bone as everywhere else is supposed to look untouched.
Once your concealer is on and you are happy with the look, you may now choose to add a touch of shimmer underneath the brow bone- this looks especially nice when wearing a strong eye makeup.
My favourite highlight to use is MAC Vanilla pigment.


What do you think of this trend? Do you prefer it to the strong brow that was all that everybody wanted just a few months ago?
Let me know in the comments!


Sunday 26 June 2016

MyKitCo Nude Launch Party

On Monday night I was extremely lucky to be invited along to the MyKitCo launch party of their new brush collection: the nudes. I love MyKitCo and I have supported them ever since they very first launched as a brand last November. It seems like just yesterday that I went to their opening launch!

MyKitCo is a brand designed for professionals (and makeup lovers!) providing a collection of high quality makeup brushes and accessories created by renown makeup artist James Molloy.
I fell in love with this brand the moment I tried their products.Their brushes are an outstanding quality at fantastic prices and they have so many smart accessories that make life as a makeup artist much easier!


The launch was held at the Cloud 23 bar in the Hilton hotel, Manchester, giving us the most amazing view of the city as the sun set. On the evening we were each greeted with a goody bag and a friendly welcome from James and Alex who both own the brand together. After meeting James and Alex once before and speaking to them via email and social media, I can tell how passionate they are about their company. The guys always go the extra mile to always provide a fantastic service to their customers and I think that this is what makes their brand extra special and exciting.


On the night we were treated to a live demonstration from James himself on the stunning model, Sophie Billington where James used and talked us through the new NUDE collection brushes and showed us how to achieve a high fashion bronzed glossy look.
I picked up so many tips and tricks from James and thoroughly enjoyed watching him work.


Inside our goody bag, we were gifted a small face powder brush with a flat and tapered structure, a beauty blender sponge and a cute little MyKitCo badge which will look great pinned to my kit.
The brush that we received in our goody bag is extremely soft (like all of the MyKitCo brushes) and I can imagine that it will be perfect for applying any precise powders, for example highlighter, setting powder and blush.

Now onto the products that I bought for myself with the impossible to resist exclusive 20% off discount. I decided to buy 3 eye brushes which were the 1.15, 1.12 and 1.13.
1.15 Pro-My blending shadow has a large soft full rounded brush head made from natural fibres. This is a classic blending brush which will always come in use when creating any makeup look. I like this brush because it is big enough to thoroughly blend shadow however it is slightly tapered which will help to keep the colour where you want it to be.

1.12 Pro-My tapered crease looks very similar to the 1.15 brush mentioned above however this is slightly more tapered which makes it ideal to use in the eye crease. The brush head tapers to a soft point, which helps blend powder shadow evenly. I think that this brush would be ideal to use when creating a cut crease eye look.

1.13 Pro-My detailing smudge has a small rounded brush head and the size and shape of this brush allows for a snug fit along the lash line. I will use this brush to smudge eye khol pencil close to the lash line and also to apply product underneath the lash line to create a sultry smoky look.

All of these brushes are extremely soft and well made; from the solid wooden handles and tightly crimped bristles to ensure the longest life of your brushes, each piece is finished to the highest quality and I can definitely see where the care and thought has gone into the process of each makeup brush.


I love drawing and designing my own face charts so I decided to pick up a pack of 15 professional face charts printed on the best quality paper meaning that I will be able to produce creative face charts to help me develop my skill as a makeup artist. 

Keeping my makeup kit organised is very important and it also makes my life a lot easier! MyKitCo have a variety of kit organisers which help makeup artists keep their kit looking professional and tidy at all times. 
I use a lot of loose pigments and as much as I love them, they can be a nightmare to carry in my kit because the packaging can easily open and spill everywhere which can make a massive mess and can waste product. To keep my loose pigments separate to the rest of the makeup in my kit I decided to pick up this small storage bag. My Mini PVC Bag is perfect for storing small items such as pencils, skin care bottles, pigments and glitters. 

Muji used to be my go to shop for buying tiny tiny cotton buds to use for makeup until MyKitCo released their My Small 'On Point' Buds which put Muji to shame! These buds have the smallest and sharpest point which make them perfect to use when correcting makeup. 
These are a must have in my kit! 

Finally, I picked up a My Mini Metal Pallet which is something that every makeup artist needs to stay hygienic whilst doing someone else's makeup. Using the back of your hand as a mixing pallet is fine from time to time but I think that it is nice to have somewhere separate to mix colours and hygienically apply products onto your client. I like this pallet because it is compact and will fit inside my kit easily. 


I am extremely grateful to have been invited along to the MyKitCo NUDE launch party. I had a great time and I am yet again extremely impressed with the things that James and Alex have achieved and I can't wait to see the brand grow even more. 

Check out the MyKitCo online website where you can order your brushes and accessories now!
https://www.mykitco.uk/


Monday 13 June 2016

IMATS LONDON 2016

Last weekend Olympia London held the annual IMATS makeup convection which is the International Makeup Artist Trade Show where the industry get to meet, swap skills and big makeup brands offer great discounts to professionals.
IMATS is a fantastic 3 day show and I am so glad that I had the chance to go this year.

Being a budding makeup artist and makeup student (not for long now- I qualify in a week.. eee!), IMATS is the place for me and I have dreamed of going for years. It is full of people with the exact same interest and passion which gives you such a buzz for the industry.

Shopping at IMATS was a great experience, there were so many great brands including MAC Pro, Bobbi Po, Urban Decay, NYX, Zoeva, Inglot and many more. I managed to pick up some products with big discounts which is always helpful when building up a makeup artist kit!

Aside from shopping, I also enjoyed listening to the guest speakers and watching the amazing demonstrations from talented artists. One of my favourite talks was from Kevin James Bennett who shared his tips and tricks to becoming a successful makeup artist for photoshoots and red-carpet events whilst also sharing his hilarious opinions on 'Instagram makeup'.
I also loved watching prosthetic artist, Neil Gorton and MAC senior artist Rebecca Butterworth unite to create a unique, high fashion editorial makeup look.


Back to the shopping, I could not resist sharing with you the amazing makeup that I picked up .....

MAC PRO
MAC is the ultimate makeup artist brand and they have just a handful of special pro stores across the UK which hold exclusive products that are only available in those stores. The PRO stores are all in London which means that it is extremely difficult to get your hands on these exclusive products here in and around Manchester where I live.
Fortunately a handful of the pro products are now available to order online, however I personally don't think that shopping online for makeup is easy and I much prefer to see the products in person before I buy. The MAC Pro counter at IMATS was massive and I could not resist picking up a few bits!


Glitter, 3D Platinum & 3D Black 
Anyone that knows me will know that I love glitter and I very rarely believe a makeup is complete without a touch of sparkle. The MAC glitter's are a pro product which means that they are only available in pro stores or online so I knew that I had to pick some up when I visited IMATS. The glitter's are in the same packaging as MAC's loose pigments which is a generous sized pot with enough product inside to last you for forever.

I decided to pick up 3D black glitter which has a black layer with multi tonal small flecks of glitter. I think that this would look stunning ontop of a deep smoky eye or pressed over a dark lipstick.
3D Platinum is a silver with blue tones and I can imagine it to be the perfect addition to any creative festival inspired makeup.


Mineralise Skin finish Natural, Light Plus 
The mineralise skin finish natural powders are a kit staple for me and I use them on almost everybody. I love these powders because they give a small amount of coverage which is buildable, they mattify the face and never look cakey.
I use the shade Medium the most in my kit although I wanted to pick up a lighter one to suit paler complexions.

Cream Colour Base, Hush 
I am constantly hearing other beauty bloggers and makeup artists rave about MAC's Hush cream colour base so I decided to pick one up myself to see what all the fuss is about.
MAC's cream colour bases are a creamy multi purpose product that you can use on the eyes and face. I already use and love Pearl cream colour base which is a silver pearl and looks beautiful on the tops of cheekbones to give a subtle glow.
Hush is a rosey pink shade with a golden glow. It reminds me of NARS Orgasm blush which I love so I can't wait to start using it.


Eyeshadows, Coppering & Steamy & Swiss Chocolate 
I have a serious love hate relationship with MAC eyeshadows because for the price, the quality isn't always the best and I know I can get a better quality with another brand for cheaper. Having said that, I do love the colour selection that MAC have and some of the colours are very well pigmented.
MAC have a fantastic selection of bright coloured shadows which I think makes them really stand out from other brands who often just have a plain choice of nudes which are always the same. 


The eyeshadows that I decided to buy were Coppering, Swiss Chocolate and Steamy.
Coppering is a beautiful burnt orange copper shade which is very different to any other copper shadows that I already own. I have already used Coppering and it is extremely easy to wear and is the perfect colour to wear during the upcoming summer months.
Swiss Chocolate is a boring brown but I was missing a nice matte deep brown that wasn't too warm or orange and Swiss Chocolate looks like the perfect one for the job.
Steamy is a pretty mermaid blue that is very well pigmented and has a pearly metallic finish. I love this colour and can't wait to use it for a bright summer makeup!


NYX 
Glitter Primer 
As much as I love glitter, it can be difficult to apply without covering your whole face in it so I was on the hunt for a good glue to use underneath glitters to make them stick in place.
I decided to try the NYX Glitter primer which comes in a funky holographic tube and I am excited to see how it performs.


ELDORA
H160 & H155
Everybody always raves about Eldora false eyelashes so when I saw their stall at IMATS I knew that I had to pick some up and see what all the fuss was about. I decided to buy 2 pairs; h160 and h155 which both look very wispy and wearable which is what I love.


MAKEUP FOREVER 
Ultra HD Foundation 
Makeup Forever isn't easily accessible here in the UK so I was happy to see that they had a stall at IMATS this year. I haven't tried any of their products before, however I had heard a lot of good things about their Ultra HD foundation, so I decided to give it a go- especially when it cost me just £17 instead of the original retail price of £29 (what a great deal!)

I have already tried this foundation a few times on myself and so far so good... I love how lightweight it feels on my skin whilst still giving a good medium coverage. Stay tuned to see my full review soon!
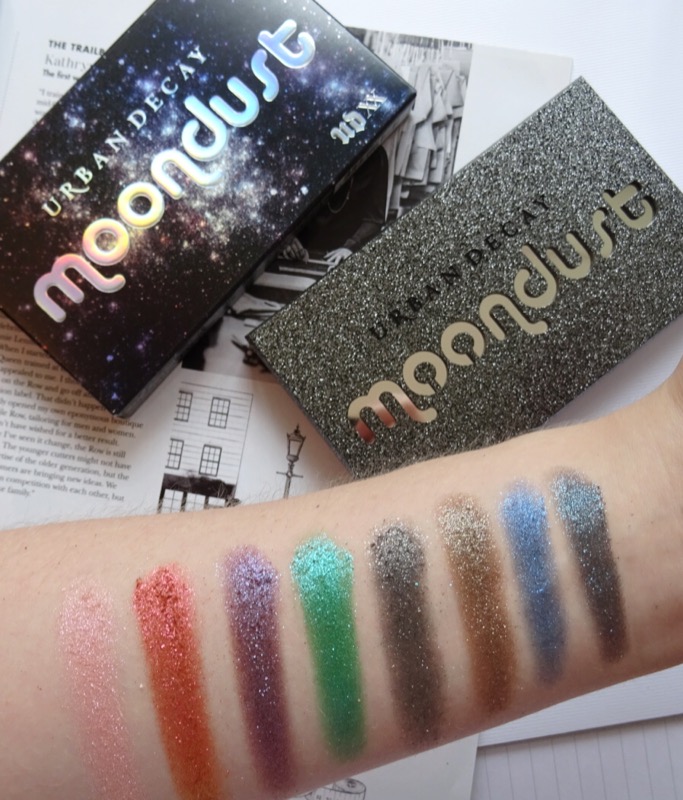


URBAN DECAY
Heavy Metal Glitter Liners
Urban Decay is one of my favourite makeup brands and just a few weeks ago I bought their Heavy Metal Glitter liner in the shade Distortion and I have not put it down since. I love how easy it is to apply, the effect is amazing and I have received so many compliments whilst wearing it.

I loved the shade and formula of Distortion so much that I knew I had to buy more when I was at IMATS ....  I ended up buying the whole collection!!!

These glitter liners are super easy to apply and they give off such a great effect. You don't need a glitter glue or primer and the colour lasts all day- what's not to love?!
Glamrock is a true silver which will look great paired over any eyeshadow.
Amp is a pretty mermaid blue and Spandex would look stunning applied over a deep smoky eye.
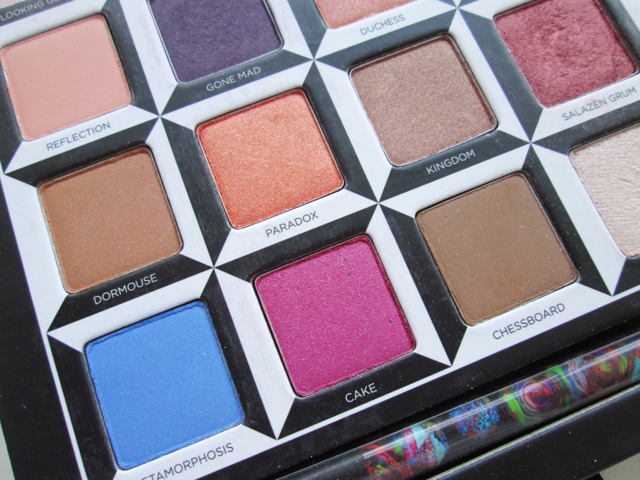
Finally, Junkshow is a gorgeous pink with iridescent flecks on milti coloured glitter running through- I love how this looks on the eyes. (See picture below of me wearing Junkshow applied over Urban Decay eyeshaodw in the shade Salazen Grum from the Alice pallet)


(Left to Right : Glamrock, Amp, Spandex, Junkshow)


All Nighter Makeup Setting Spray 
Whilst at the Urban Decay counter I had to stock up on my favourite setting spray that I swear by and recommend to almost everyone.
If you want your makeup to stay in place all day/night long without having to do any major touch ups then you NEED this stuff in your life! I mist a few sprays of this after applying any makeup and I love it.


INGLOT
AMG Eyeliner Gel 76 (White)
Inglot is another brand that is difficult to access here in the UK so I enjoyed having a look around their stall at IMATS. I like creating high fashion editorial makeup looks and I thought that this white gel eyeliner would be a great addition to my kit.


CHARLES FOX 
Small Set bag 
I have recently been working on a few photoshoots and I have found that having a set bag makes life a lot easier. After applying the makeup to your model at your station they will then move away to be shot on location and as a makeup artist, you must be on set keeping an eye on the models to see if they need any touch ups. Instead of carrying powders, brushes, lip glosses etc in your pockets it is useful to have a small set bag which you can carry with all of your products inside.
I saw a lot of large makeup set bags at the show which weren't ideal for what I needed it for but then I came across this small set bag from Charles Fox which is perfect. This bag is the perfect size and has a good amount of handy compartments-  I am so excited to start using it.


Did you go to IMATS this year? What did you manage to pick up? 
I had a really great time and will definitely be returning next year! 


Tuesday 7 June 2016

Urban Decay Alice in Wonderland Eyeshadow Pallet Review

Urban Decay is one of my favourite makeup brands and I especially love their eye shadows in particular, so when I saw that they had launched a limited edition collectors pallet inspired by the movie, Alice Through The Looking Glass, I could not resist picking one up! After all, my name is Alice so it would be wrong not to buy it, right!? :') 


First of all, Urban Decay have once again gone out of their way with the packaging of this pallet- it's like no other and I really love it. 
At first when I saw pictures of the pallet on-line, I imagined it to be big and bulky, making it impossible to travel with or fit inside my makeup kit, however I was pleasantly surprised when I purchased my pallet in store. I am not saying that this is a tiny compact pallet that you can take with you anywhere, however it is a reasonable size that fits inside my zuca case easily. I was also happy to see that the eyeshadow layer slides out completely which means that you can display the pallet on a workstation without having the whole case on show. 

When you open up the wacky colourful lid you will find a large mirror and two doors which open to reveal a decorative butterfly which flaps its wings when you open and close the flaps - I love this special touch which makes the pallet fun and original! 


Once you have made your way through the wonderland packaging you will then find a draw like handle underneath which holds the main event - the beautiful and unique eyeshadows! 

Urban Decay never fail to impress me with their amazing eyeshadows and this pallet is no exception. The Alice pallet contains a great mix of bright and vibrant shades along with some pretty neutral colours which make it suitable for everybody. I particularly love the shades Hatter, Lily, Heads will roll and Slazen Grum.


Overall I am extremely impressed with this pallet from Urban Decay, I love the eyeshadow colours which are different and like no others that I already own (I own a LOT of eyeshadow pallets!)
As always the quality is outstanding and I love the packaging which is really fun and creative.