Friday 30 September 2016

Makeup Inspiration from London Fashion Week , SS17

London fashion week has gracefully flown by and I have not stopped checking my phone to spot the hot beauty trends on the forecast for spring/ summer 2017. Like every season, I have been left feeling extremely inspired and ready to experiment with new makeup trends and techniques. 

If like me you struggle to keep up with the whirlwind of fashion week, I have packed together a good roundup of the hottest makeup trends seen on the catwalk this season. 

Val Garland, phenomenal British makeup artist is a woman whose work I admire, so I am always intrigued to see what work she produces at fashion week. 
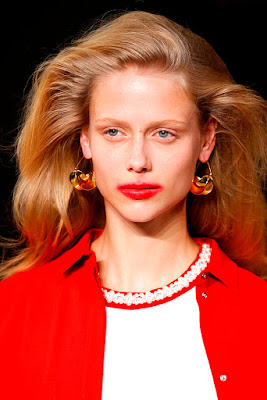
This season Val focused on bold lips and fresh, bare skin with a grunge feel. I especially love the look that she created for Gareth Pugh. The makeup was very messy which I really liked.
The models skin was kept bare with a strong glow. Highlighter is definitely here to stay. 
Gone are the days of strong overdrawn eyebrows; all of the models sported ungroomed messy brows brushed upwards. I absolutely love this look!

(Makeup by Val Garland for Gareth Pugh) 

To achieve this messy brow trend, reduce your trips to the eyebrow threading / plucking / waxing salon and stop trimming the hairs too often. If you don't want to leave your brows completely bare, use a wax eyebrow pencil and finish with a tinted eyebrow mascara / gel and brush upwards. MAC Brow Sculpt pencil and Maybelline Brow Drama are the perfect tools. 


A trend that was spotted at both the Gareth Pugh and Mother of Pearl shows was a very bold smudged lip line.  Does this suggest that lip liner is out? What do you      think?

There were a lot of 80's and 90's inspired looks on the catwalk this season, for example at the TopShop Unique show the models hair was tightly curled with lots of volume. 


Glossy skin, glossy lips, glossy eyelids .. everyone added a touch of gloss to their look this season. Exaggerating the strobing trend with a gloss really stood out to me and I will definitely be experimenting with this trend.


Generously applying a glossy balm like Elizabeth Arden 8 Hour Cream to the lips will give a plump glossy finish and you could also buff it into the skin for a great high fashion look.


I recently created an 80's inspired high shine eye using Kiko Clear Lipgloss which looks great on photo. 

 
Makeup by myself, Alice Marie Rouillon 


I always love fashion week: it feels like a breath of fresh air with lots of new exciting ideas for the creative industry!

Did you spot any different looks from me on the catwalk this season? Let me know in the comments!


Monday 26 September 2016

Smokey Eye In 5 Simple Steps

Something I get asked constantly is how to do a smoky eye and it's really not as complicated as you think. A smokey eye can be whatever you make it.

When most people think of a smokey eye they imagine perfectly blended super dark eyes which can look great when done right ; although it can be very hard to achieve and it is easy to end up with major panda eyes which isn't such a great look!

You don't have to be an amazing makeup artist to create a smokey eye and in this post I want to show you how to achieve a glamorous smokey eye makeup that is super effective and really easy to achieve.

I am going to use only 4 eyeshadows for this look and they are all MAC single eyeshadows which I have placed into an empty quad pallet to create my perfect smoky eye pallet. You can create your own custom pallet in MAC stores by choosing from the single pro pan eyeshadows and buying an empty pro pallet.

Step 1 : Prep
To create a good base for the eyeshadows I always apply MAC paint-pot all over the eye lid and I then set it in place with a loose translucent powder. This will make the eyeshadows stay in place all day and it will also provide a smooth base to help the shadows blend together and make the colours stand out.

Step 2 
Once I have the base on I am then ready to start applying the eyeshadow. Starting with Wedge eyeshadow which is a matte light brown, I apply the colour all over the eye lid and through the crease. To do this I use a small fluffy brush like the MAC 217 or the MyKitCo 1.6.
In between each step I always use a large blending brush like the Zoeva 228 to soften any edges and give a flawless finish.

Blending is key to achieving a flawless eye makeup: just remember to blend in between each step rather than only blending at the end.

Step 3 
Next I use Embark eyeshadow which is a deep brown to darken up the outer corner of the eye. To apply this shadow I use a slightly smaller crease brush like the Zoeva 231 which gives more precision and keeps the colour in one place.With a small amount of product on my brush,  I also take this shadow slightly under my eye and along the lash line to start to create a smokey effect. To do this I use a small pencil brush like the Zoeva 230.


Step 4 : Smoke it up 
If you are happy with how dark your eye makeup is looking at this point then you can skip the next step although if you do want it to look a little more smokey then using a small amount of Black Tied eyeshadow you can easily smoke it up! Black Tied is a great black eyeshadow with a slight shimmer. Using a small pencil brush, press the shadow close to the upper lash line and slightly out and upwards towards the crease. Keep applying the eyeshadow with the small brush and blend it out with a larger brush until you are happy.

Step 5 : Highlight 
Finally to add a pop of shimmer, apply a small amount of Nylon eyeshadow on the inner corner of the eye and slightly dust over the brow bone to make everything pop.

Finishing with a few coats of mascara and maybe some false eyelashes you are ready to go with a super sexy smokey eye that is easy to achieve in just a few simple steps!


I hope that you found this helpful and please leave comments below on any other blog posts that you would like to see from me.