Wednesday, 23 July 2014

Recipie: Healthy Fruit & Nut Granola Bars

I've really got into healthy baking recently and thought I’d start sharing my own recipes on this blog. In this post I'm going to show you how to make healthy fruit & nut granola bars, some people may say these are not healthy however I believe they are in moderation because they have lots of essential fats and protein which are good for you. These bars would be a perfect snack before or after exercising or simply as a little healthy snack if you’re hungry because they will fill you up and provide you with lots of energy.

I have created this recipe myself and it’s taken a lot of trial and error although I am very happy with the result and I hope you enjoy making them.
The ingredients in this recipe can be adapted to suit your preferences; for example you could use different nuts or dried fruit- search through your cupboards and see what you have!

To make 9 of these granola bars, you will need....

150 grams oats
100 grams granola (I used fruit and nut granola from Tesco)
20 grams plain flour
100-150 grams nuts (I used cashews, brazil, almonds)
100-150 grams dried fruit (I used cranberries, apricots, raisins, dates)
20 grams dedicated coconut
50 grams dark chocolate chips
40 grams sunflower seeds
40 grams pumpkin seeds
1 tsp vanilla extract
3-4 tbsp crunchy peanut butter
70 grams Butter
3-4 tbsp honey

I have very roughly estimated the measurements above because I don’t tend to weigh out ingredients with this recipe so if you make them yourself- you can simply change up the amounts.


The method for these bars is very simple. To start you need to melt together the peanut butter, butter, honey and vanilla together in a pan over a low heat until everything is melted and combined together.


Take the butter mixture off the heat and then get a big mixing bowl and throw in all the dry ingredients together.


Next, pour the butter mixture in with the dry ingredients and mix thoroughly until everything is combined. I realised at this point that I didn't have enough liquid to bring all the dry ingredients together so I had to melt some more peanut butter, honey and butter to help bring the ingredients together. The mixture shouldn't be too runny however all the oats and nuts need to be almost stuck together like a flapjack mixture should be.


Now your mixture is done, you need to get a greased brownie tin and pour in the mixture. Then place the tin into a pre heated oven for about 15-20 minutes depending on your oven, mine took about 16 minutes.


Once the time is up, check to see if yours are lightly golden brown and if so, take them out and place aside to cool.


When the bars are cooled down, cut them up into 9 squares then place them onto a plate- ready to be enjoyed by your family and friends!


I hope you liked this recipe post from me and that you enjoy making these yummy, healthy bars yourself- if you do, let me know how they turned out and if you liked them!


Wednesday, 16 July 2014

Quick & Easy Glamorous Eye Makeup

I've had a few compliments on a certain eye look which I've been wearing a lot recently. It’s fairly easy to achieve and doesn't require a lot of products so I've decided to create a mini tutorial on how to do it! I hope you enjoy this post and maybe learn something new :) 

To start I applied a small amount of MAC paint pot in Painterly all over the lids to create a nice, blank base and to prime the eyes. This step could be optional however I like to do it to ensure that the shadow stays on all day/night.


To get a neater finish with the shadows, I decided to get some thin sticky note strips and I stuck them on going from the outer corner of the eye at an angle to meet where the eyebrow would naturally end. One thing I would recommend when doing this is to start with your eye makeup then go onto your face make up to ensure no shadow will fall down and mess up your face. If you want to read more about this trick, click here to read Amelia Liana’s post about it.

Next I got the MAC eye shadow in Naked Lunch which is a beautiful, shimmery pink toned champagne colour and I applied it all over the lid with a MAC 217 blending brush (any eye shadow brush would do the job). I also took this colour right into the inner corner of my eye to brighten.


With a finer, more defined brush like this double ended one from Primark; I got MAC Satin Taupe eye shadow and roughly lined this colour in the crease of my eye lid. Don’t worry if this turns out messy because next you will be blending it out completely with a clean blending brush. I used another MAC 217 brush and kept blending till I was happy with the result.


Back with Naked Lunch eye shadow, I gently swept some colour onto my brow bone to highlight and to also blend together the two coats of shadow already applied.

At this stage you could take off the tape like I did or you could keep it on to help guide you when applying the liner. If you don't like the harsh look that the tape could possibly give- simply get a clean brush and buff it out until you're happy. 


I really think that using eye liner completes a look and makes it look more impressive, for this look I used the brand new Benefit They’re Real Push Up Liner (which I love!- click here to read my review) and carefully lined my upper lash line, ending with a slight flick. I won’t go into too much detail about my eye liner because I am definitely no expert on the subject and still have a lot to learn, however I do find that the results I've been achieving with this new gel liner have impressed me and I love the finish it gives.


Eyelash curlers are never something that I've used before because my lashes are already naturally quite long so I didn't think I needed them. However recently I've found that curlers help to separate my lashes which help to avoid clumps when applying mascara afterwards. I really like these ones from Models Own and I also love the bright orange colour!

After curling my lashes I then went onto applying my Benefit They’re Real mascara which creates the most amazing look and paired with the liner, it gives the perfect ‘wow’ lashes!


This last photo is NOT with the eye makeup that I have shown alove- It's simply to show the mascara and liner because I messed up my liner on the original makeup look. 

That’s my look done- It’s really simple and easy to achieve but very impressive. I found it to be very long wearing and quick to do.

I hope you've enjoyed this post from me and I’ll speak to you soon! 

Wednesday, 9 July 2014

Review: Benefit They're Real Mascara AND Liner

I'm sure you have heard about Benefit’s new launch of the they’re real push up liner. I recently purchased both the mascara and new liner from the they’re real collection and thought I’d review them both in one post for you.


I’ll start with the mascara which I got in duty free last month when I went to Paris and was able to get it for a slightly cheaper price.

This mascara retails for £19.50 on the high street which I personally think is overpriced for mascara however I do really like it and I am very impressed with the results.
Benefit claim that the mascara ‘lengthens, curls, volumises, lifts & separates lashes for a spectacular “out- to here” look’. I do agree with the majority of these points and I've found its one of the only mascaras that I've ever used which lengthens AND volumises- I usually find mascara is only good at one or the other.

One of the biggest ‘wins’ for me is that this mascara is extremely long wearing- one thing I hate with mascara is when it flakes off throughout the day and falls onto your cheeks. They’re real mascara doesn't do this! It stays on my lashes all day long and they look as dramatic as ever without having to re-apply throughout the day.

I really like the brush on this mascara; it’s specially designed to maximise the performance of the long-wearing, glossy formula. The staggered bristles grab close to the root, boosting length and volume to the lashes. The precision bristles help define and curl even the smallest lashes- perfect!

This mascara is very buildable, you could apply one coat and get natural-full looking lashes or you could apply a few heavy coats to get an impressive ‘false lash’ look without having clumpy lashes. I personally think that it’s a great all-rounder product for everyone.

Overall I am very impressed with the Benefit They’re real mascara and would recommend it to anyone who wants to give their lashes a slightly expensive treat!


Now onto the liner! Benefit has been advertising this product for a while now and it was finally launched last weekend to the public. I happened to be shopping on the day it launched and got dragged over to the Benefit counter to have a nosey at the new liner. After having one of the lovely girls who works at Benefit try out the liner on me, I was slightly naughty and purchased it after being so amazed at how easy and impressive it looked.

The liner retails at £18.50 which again, is very pricy for just an eyeliner and I definitely won’t be buying this again carelessly without any thought! However I do really like this eyeliner and I am happy that I decided to buy it.

It’s the first ever lash-hugging gel liner in a pen- gel liner is known for being a tricky thing to do and many people think that only professionals can master the technique, however now Benefit have launched a gel liner in pen form which makes it easier and quicker to apply.

I was expecting the liner to be slightly easier to apply myself because I do find myself having to be careful and slow when using it however I have found it easier than other liquid liners that I've used in the past.

Just like the mascara, this liner is extremely long wearing which I love. I've found it to look perfect even after a whole day out without having to touch up.

To get a simple everyday winged line with this, you simply twist the bottom of the pen to dispense the gel out of the angled tip then drag the pen from your inner corner all the way along then flick out at the side. You will get an impressive jet black, matte line which hugs the lashes to make your eyes appear bigger.

The only downsides for me are that this gel is very quick drying and I find it hard to clean up quickly if I make a mistake. Also If I apply it too thickly I find that throughout the day it can sometimes start to ‘flake’ off in patches which isn't great.

Overall I am very impressed with this product and am glad that Benefit launched it. I would like to do some more research to see if I could get a similar product for a cheaper price because I think that this liner is very over priced for what it is although I am very happy with the product at the moment.


I hope you found this post useful and that it’s helped. I think that both products used together give an amazing look and I love it :) 


Thank you for reading- speak to you soon! 

Thursday, 3 July 2014

June Favourites

It’s July! So it’s time to tell you exactly what I've been obsessing over this month.
I have made a few exciting discoveries this month so I've got a fair few products to tell you about, I hope you enjoy the post.

The Body Shop seems to be taking over my favourites this month, I absolutely love their products right now, and I’ll start by mentioning the Vitamin E hydrating toner. I've only ever used a toner once before and that one dried out my skin and didn't feel very refreshing. However I am very impressed with this one from The Body Shop. It’s very refreshing and doesn't irritate my skin, if you want to know more information about it, click here to read my skincare routine post.

Another product from The Body Shop Vitamin E collection which I really like is the Illuminating Moisture cream. I think this could be a hit or miss product for some people but I really like it, it’s a moisturiser which has tiny light reflectors inside which gives your face an illuminating glow. I wouldn't wear this moisturiser alone however with makeup on top; I love the subtle glow that seeks through the skin. The moisturiser itself is really nice; it’s very hydrating and suits my skin well.


I've not owned The Body Shop Camomile Cleansing Oil for long but I already love it so had to include it in this post! I heard lots of good reviews about this cleanser and I really love skincare at the moment so I had to try it out- and I wasn't disappointed! I simply get some product onto a cotton wool pad and gently sweep it across my face to cleanse my face and remove makeup. I've found this to remove my makeup really well which I wasn't expecting- it even does a good job at removing Benefit They’re Real products (if you own some- you’ll know what I'm talking about!) The smell isn't too strong but is nice and subtle.


Garnier bought out a new coconut shampoo & conditioner this month and if you know me, you’ll know that I'm obsessed with anything coconut so I had to give them a try! I was very impressed with the quality; I have been using Aussie shampoo for months, thinking it was the only good hair brand however these products from Garnier are just as good in my opinion (plus they smell amazing which a bonus !) I personally don’t like to use conditioner every time I wash my hair so I like to have a nourishing shampoo- this coconut shampoo from Garnier does just the job and makes my hair silky smooth J


The past few months I've really been struggling to find a good nail polish which lasts. My nails have not been in great condition recently and only keeping polish on for 1-2 days. This was until I tried out Tanya Burr’s nail polish in Little Duck. I've owned this for a while now but not sure why I stopped using it because it’s such a lovely colour and is amazing quality. The colour is a perfect summer shade and it also lasted me about 4 days which is very unusual with my nails. This is also a favourite because Tanya herself retweeted my photo of my nails whilst wearing this on twitter which made me very excited!


When I went to Paris a few weeks ago, I picked up the Benefit They’re Real mascara in duty free because I've been tempted by it for so long and thought I’d finally treat myself. I have been a little bit more sneaky since and also treated myself to the They’re Real Push up Liner however I've not fully tried and tested that yet but I will report back when I have! Back to the mascara - I agree with the hype and think that it’s great, it makes my lashes voluminous, long and keeps them separated. I was a bit put off this to start with because I'm not a big fan of the OOT false lash look; however I've found that you can build it up so I tend to stick to one layer for a natural look. Stay tuned to my blog because I'm hopefully going to be doing a double Benefit They’re Real review of the mascara and liner.


I've mentioned these next two products before in different posts so I'm not going to ramble on too much about them now- however I have really enjoyed using MAC Charcoal Brown with Benefit Gimmie Brow ontop for my eyebrows. I find the Benefit gel is a great setting product and ensures that my brows stay in place all day and the MAC shadow allows me to get a good shape.


Two more Body Shop products here- whoops!

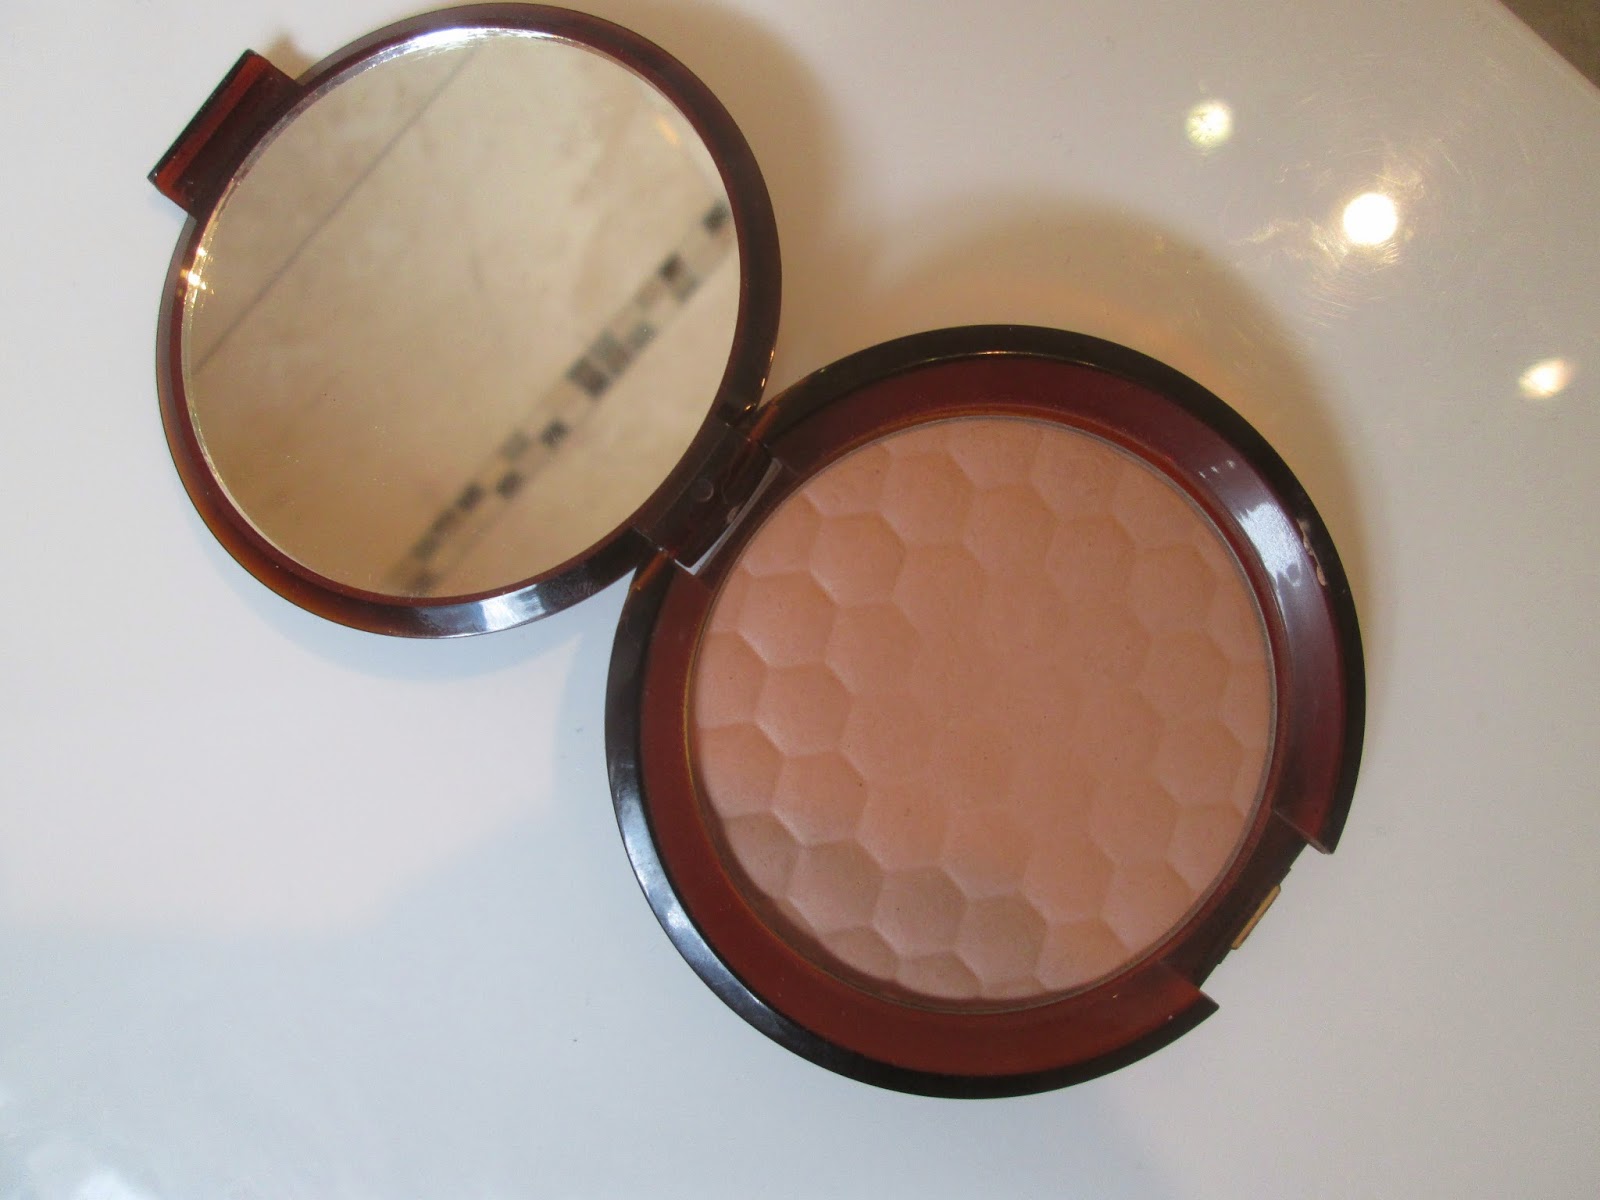
The Body Shop Honey Bronzer is a great bronzer for fair skinned ladies who want a subtle glow or some definition. I've been using this a lot this month and have really been converted to contouring because I've finally found an affordable bronzer which isn't too shimmery or too orange.


My final favourite from The Body Shop is the coconut body mist. I absolutely love this because it leaves a lovely subtle coconut scent which lingers on the skin/clothes for a long time. I really like the bottle- it feels like a very expensive product although at just £7.50, it’s an affordable body spray for the amount of product you get. I really love the scent and I know that it’s perfect for summer!


I have a couple of non-beauty favourites this month which include a book which I'm sure many people have heard of called The Fault in our Stars by John Green. I've literally just finished the book last night and I loved it so much; it’s a sad story although the mood is very uplifting and really makes you think about things you wouldn't usually think about. I really want to go and watch the film now that I've finished the book because I enjoyed reading it a lot.


My final favourite is H&M. I've always loved the shop however recently I've been finding so many great things in there and for really affordable prices which is an added bonus! For example I got a pair of super stretchy treggings (basically jeans without the zips/buttons) which I have been wearing nearly non-stop since buying them. I've also been finding lots of amazing printed skirts in H&M for under £10 which is great and perfect for summer.

I hope you've enjoyed this post. Let me know in the comments what your favourites have been this month and if you recommend that I try any of them.
Speak to you soon! X  

Tuesday, 1 July 2014

Cook With Me- Sushi!

Myself and my friend Alex love sushi so yesterday we attempted to make our own and it was a surprising success!

Sushi looks very difficult to make, but we managed it and we were really pleased with the results.

In this post I’m going to quickly tell you what we did and I’ll be showing you some photos. I’d really recommend having a go at making your own sushi; it’s very healthy, tasty and a lot cheaper to make yourself at home.


To make this sushi you will need the following-

-Sushi rice
-Sushi Nori
-Smoked Salmon
-Avocado
-Cucumber
-Sushi Rolling Mat
-Soy Sauce (Optional)

I got the sushi rice and nori from Tesco however you can buy these things from many different places.

To start you need to cook your rice, for 2 people we used half a bag of sushi rice. Get a pan of water up to the boil and let the rice cook in there for about 15 minutes or until the rice has absorbed the water and is cooked.

Whilst the rice is cooking you should prepare the rest of your ingredients- chop up your cucumber, avocado and salmon into strips (as you can see in the photos.)


Once the rice is cooked and you have all your sushi filling chopped, it’s time to start rolling! :’) We used a sushi rolling mat however if you don’t have one, you could probably manage without it.


Get one sheet of nori (seaweed) and place it onto the mat. Now get some rice and spread it onto the middle- we learnt not to put too much rice inside because our first attempt was like a rice roll! Ensure the rice is spread evenly and isn't too thick.
Now you need to decide what filling you are going to use, we did a mixture of cucumber, avocado & salmon and salmon.


Once the rice and filling (cucumber, avocado or salmon) are inside the nori, it’s time to roll it up! It’s quite self explanatory from the photos so I hope you get the idea.
Once it’s rolled up you can cut it in half, and then finally cut the sushi into smaller pieces ready to be served!


I hope you enjoyed this quick cooking post from me and that you feel inspired to go and make your own sushi. We had some for lunch in the garden with soy sauce and lemonade to drink- a perfect summer lunch!